
What is OAuth 2.0?
OAuth 2.0 is an authorization framework that lets one application access your data on another service—without ever requiring you to share your password. Instead of handing over your login details, you simply approve access— like clicking “Allow this app to view your Google Calendar”—and the app receives limited, controlled permissions. Your credentials never leave the original platform.
Under the hood, OAuth 2.0 is built around one simple idea: your credentials stay yours. Rather than passing passwords around, the authorization server issues scoped, time-limited access tokens that carry just enough permission to get the job done.
Think of it this way — you’re not handing over your house keys. You’re giving out a temporary keycard that only opens specific doors, and expires when the job is done.
OAuth 1.0 vs OAuth 2.0 — What Actually Changed?
Ever wondered why everyone moved to OAuth 2.0? Here’s what’s different:
| Feature | OAuth 1.0 | OAuth 2.0 |
|---|---|---|
| Complexity | Heavyweight — required cryptographic signatures on every request | Much lighter — token-based and far easier to implement |
| Security Model | Relied on request signing (HMAC, RSA) | Uses bearer tokens, with optional extras like PKCE |
| Token Type | No standard format | Clearly defined access tokens and refresh tokens |
| Ease of Use | Painful to implement and even harder to debug | Developer-friendly and widely documented |
| Performance | Slower due to per-request signature verification | Faster — no signing overhead |
| HTTPS Requirement | Could technically run without it (not advisable) | Mandatory — no exceptions |
| Scalability | Rigid and hard to extend | Built to scale and adapt |
| Grant Types | Very limited | Multiple options — Authorization Code, Client Credentials, and more |
| Mobile / SPA Support | Poor fit for modern apps | Purpose-built for mobile and single-page applications |
| Adoption | Largely phased out | The current industry standard |
How Does the OAuth 2.0 works?
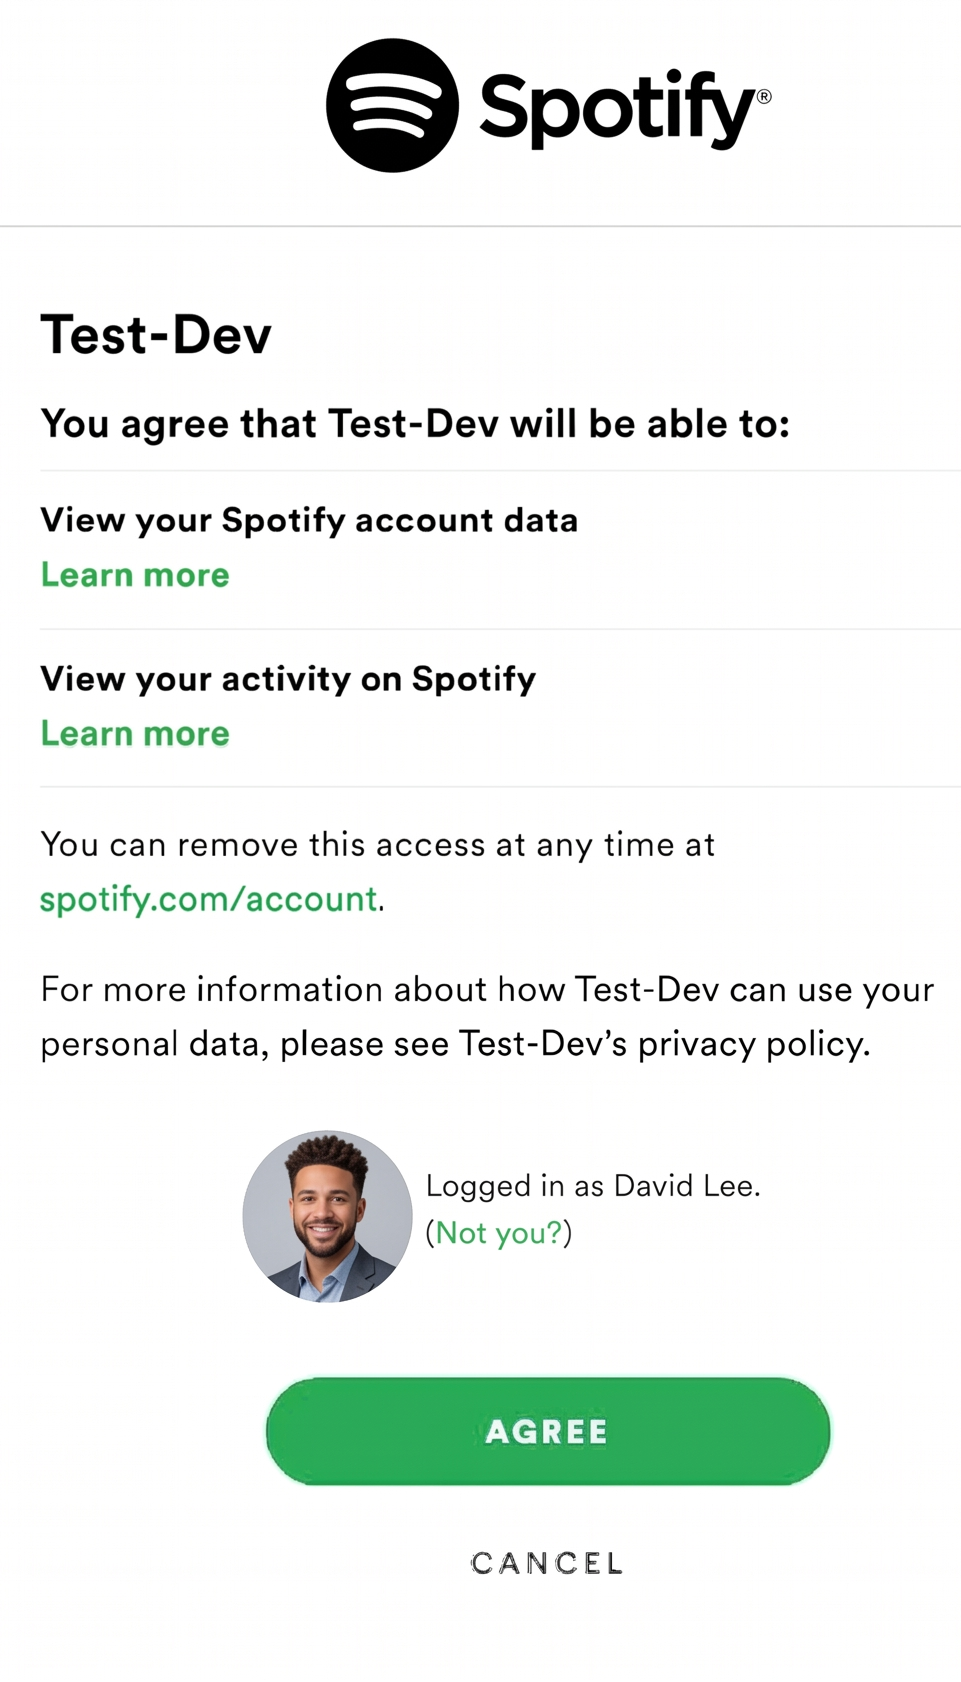
Ever wondered how a third-party application can access your Spotify listening history or account data without you ever handing over your Spotify password? That’s OAuth 2.0 doing its job behind the scenes.
Instead of sharing your actual login credentials with the new app, a secure handshake occurs. As shown below, the platform (Spotify) presents a clear consent screen to the user (David Lee), detailing exactly what information the external app is authorized to see before any access is granted.
The Core Roles Involved
The Client App
This is the application knocking on the door, asking for access to data it doesn’t own.
The Resource Owner
Simply put, this is you—the person who owns the data and holds the power to approve or deny the request.
The OAuth Provider
Think of this as the overall gatekeeper ecosystem. It holds your data and decides whether to hand out access by operating through two distinct, essential components:
- The Resource Server (The Locked Vault): The component where your actual data (profile info, files, photos) is securely stored. It only unlocks and shares resources if the Client App presents a valid access token.
- The Authorization Server (The Security Desk): The component that verifies your identity and handles your consent. Once you approve the request, it generates a unique, limited access token for the Client App. It doesn’t store your data; it only manages the keys.
How the Flow Actually Works
While OAuth 2.0 utilizes different “Grant Types” depending on the architecture, user-interactive applications (like the industry-standard Authorization Code flow) follow this essential four-step sequence:
- Authorization Request
The Client App redirects you to the Authorization Server. Along with the request, it sends specific parameters telling the provider exactly what data it wants to access (known as “scopes”) and where it should send you once the request is approved. - User Consent
You land on the provider’s official secure page. Here, you authenticate your identity and review the precise list of permissions the app is asking for. Crucially, the app never sees your password. Nothing moves forward unless you explicitly grant approval. - Token Issuance
Once you give the green light, the Authorization Server generates a unique Access Token. In standard secure implementations, the server passes a temporary authorization code back to the app first, which the app then exchanges securely for the actual Access Token. This token is strictly scoped to the permissions you allowed and comes with a strict expiration timer. - Resource Access
The app carries that access token to the Resource Server (the vault). The server validates the token to ensure it is authentic, active, and possesses the right permissions. If everything checks out, the server releases only the specific data you authorized—nothing more.
Grant Types — Choosing the Right Flow
Authorization Code Grant
The go-to for server-side applications. After the user approves access, the Authorization Server hands over a short-lived, one-time authorization code. The app’s backend server then exchanges that code for an access token entirely server-to-server. Because this exchange happens in the background, the access token and the app’s private credentials never touch the user’s browser, keeping them safe from interception.
Implicit Grant
Originally designed for single-page apps with no backend. In this flow, the access token is returned directly in the browser’s URL fragment after consent. While convenient, it exposes the token to significant security risks, such as browser history leaks and token interception. Because of these vulnerabilities, the Implicit Grant is officially deprecated. Modern frontend and mobile applications have migrated to the safer Authorization Code Flow with PKCE (Proof Key for Code Exchange).
Key Concepts, Simplified
| Term | What It Means |
|---|---|
| Access Token | A short-lived, securely signed digital key that the client application uses to request data from protected APIs. |
| Refresh Token | A long-lived token used to request a new access token when the old one expires |
| Scope | The boundaries of access. The app requests a specific list of permissions (e.g., read:profile), and the user chooses whether to approve them. |
| Authorization Server | Handles login and hands out tokens |
| Resource Server | The API ecosystem holding your actual data (like your photos or files). It inspects and validates the access token before handing over information. |
Worth noting: OAuth 2.0 handles authorization — what an app can access. It doesn’t verify who you are. For identity and authentication, that’s what OpenID Connect (OIDC) is for, which is built on top of OAuth 2.0.
What is OpenID Connect (OIDC)?
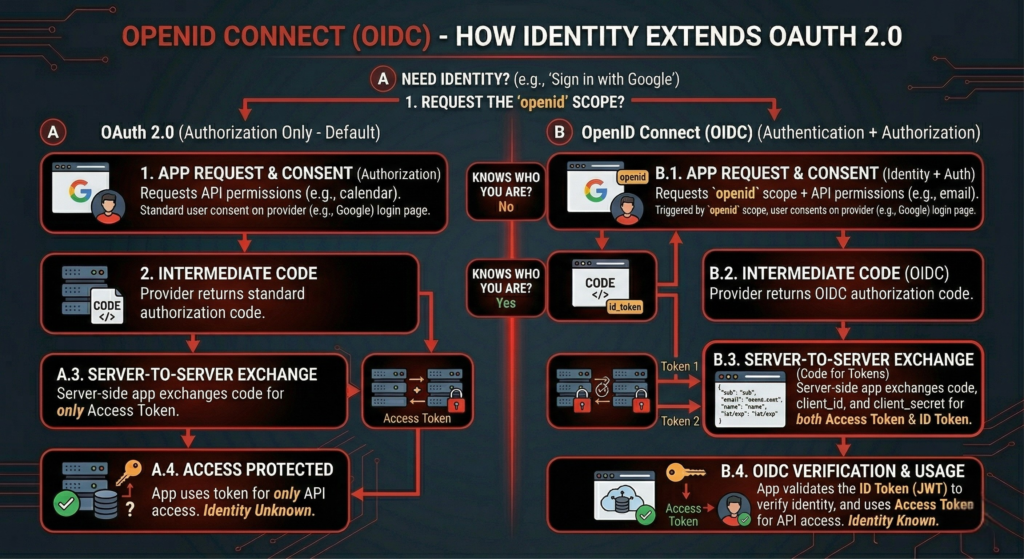
Remember how we said OAuth 2.0 handles what an app can access, but not who you are?
It never tells the app who the person behind the approval actually is. The app just know it’s permission – not the identity of person who granted it. It’s an identity provider tells the client application “who we are?”
That’s exactly the gap OpenID Connect fills.
OIDC is an identity layer built on top of OAuth 2.0. It doesn’t replace OAuth – it extends it. While OAuth hands out access tokens to reach protected resources, OIDC adds an ID token that actually tells the app who just logged in.
Think of it this way – OAuth is the key card that lets you into a building. OIDC is the employee badge that says whose key card it is.
How OIDC Differs from OAuth 2.0
| OAuth 2.0 | OIDC | |
|---|---|---|
| Purpose | Authorization – What can this app access? | Authentication – Who is this user? |
| Token Issued | Access Token | Access Token + ID Token |
| Use Case | API Access, delegated permissions | Login systems, verifying user identity |
| Knows Who You Are? | No | Yes |
How the OIDC Flow Works
It follows the same steps as OAuth 2.0, with one addition:
- Access Request — The app requests the
openidscope along with anything else it needs. Thatopenidscope is the signal that triggers OIDC. - User Consent — You log in at the provider’s page and approve the requested permissions.
- Token Issuance — The client application receives both an Access Token and an ID Token. (In a secure backend flow, the app achieves this by exchanging an authorization code, client ID, and client secret with the provider).
- Identity Verified — The app decodes and validates the ID token to confirm exactly who you are, without ever asking for your password.
The ID Token
A JWT (JSON Web Token) that carries verified information about the user, such as:
- sub — A unique identifier for the user
- email — The user’s email address
- name — Their display name
- iat / exp — When the token was issued and when it expires
The app doesn’t need to make an extra API call to figure out who logged in — the ID token already carries that information, signed and verified.
Where You’ve Already Seen OIDC
Every time you hit “Login with Google”, “Continue with Apple”, or “Sign in with Microsoft” that’s OIDC in action. The app isn’t getting your Google password. It’s receiving a verified ID token from Google saying _”yes, this person is who they say they are.”
Registering Your App with Google OAuth
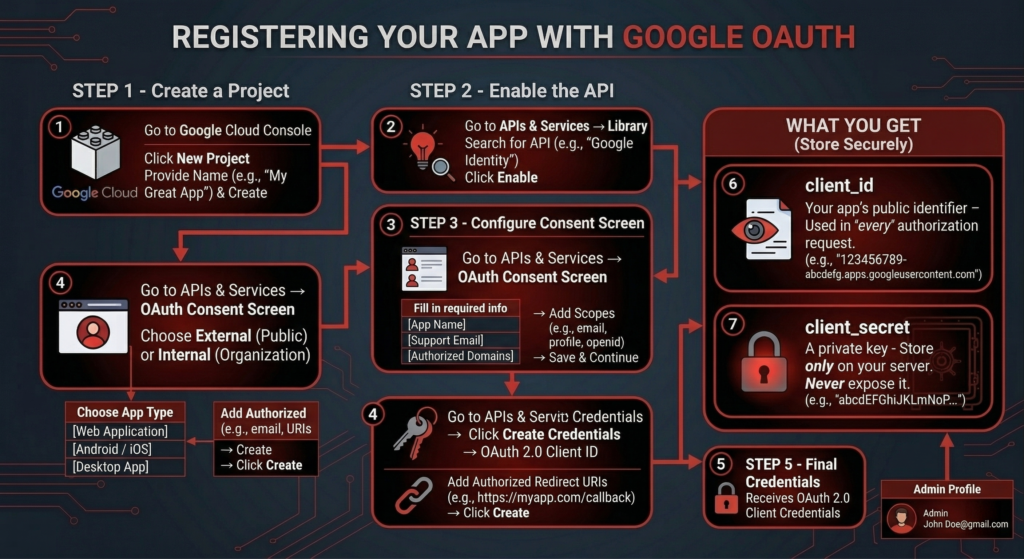
Before your app can use Google OAuth, you need to register it with Google. Here’s how:
Step 1 — Create a Project
- Go to Google Cloud Console
- Click New Project
- Give it a name and hit Create
Step 2 — Configure the Consent Screen
This is what users see when your app asks for permission.
- Go to APIs & Services → OAuth Consent Screen
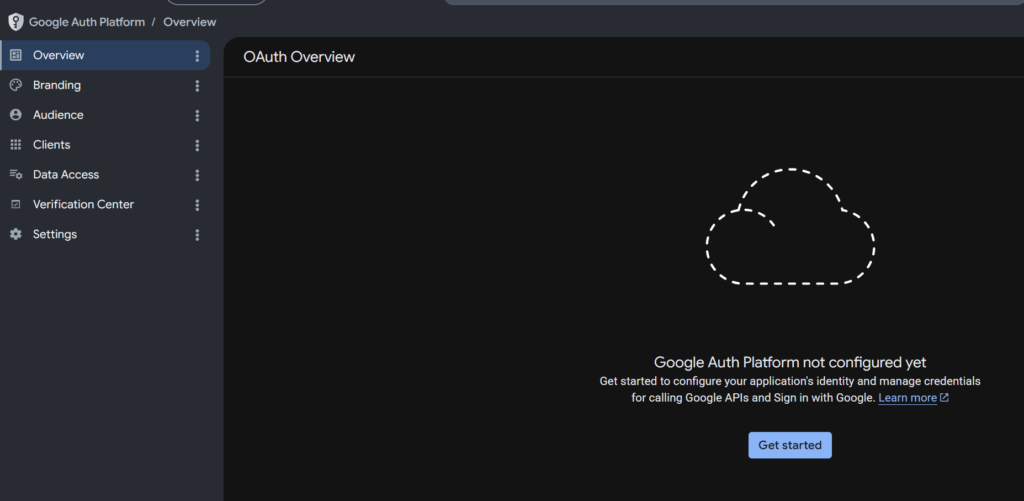
- Click Get started and provide app information
- Fill in:
- App name
- Support email
- Audience: External
- Contact Information
- Click Create
Step 3 — Select Scopes
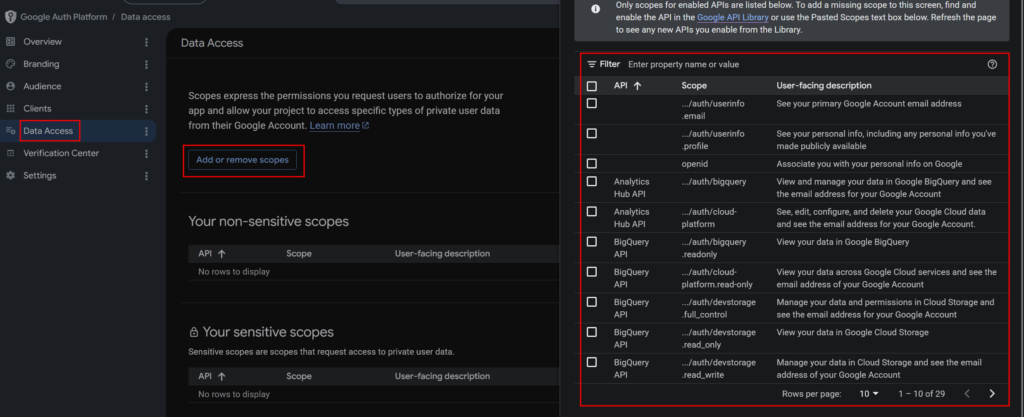
- Click Data Access from side menu
- Add or remove scopes
- Add the scopes your app needs (email, profile, openid, etc.)
- Click Update
- Save
Step 4 — Create OAuth Credentials
- Go to Clients tab from side menu
- Create Client
- Choose your application type:
- Web Application — for websites
- Android / iOS — for mobile apps
- Desktop App — for native apps
- Fill App Name
- Add your Authorized Redirect URIs — the exact URL Google sends the user back to after login
- Click Create
You will get “Client ID” and “Client Secret”. Download JSON file and save it securely.
What You Get
Google gives you two things:
client_id | Your app’s public identifier — used in every authorization request |
client_secret | A private key — store this only on your server, never expose it |
Authorization Code Flow — Step by Step
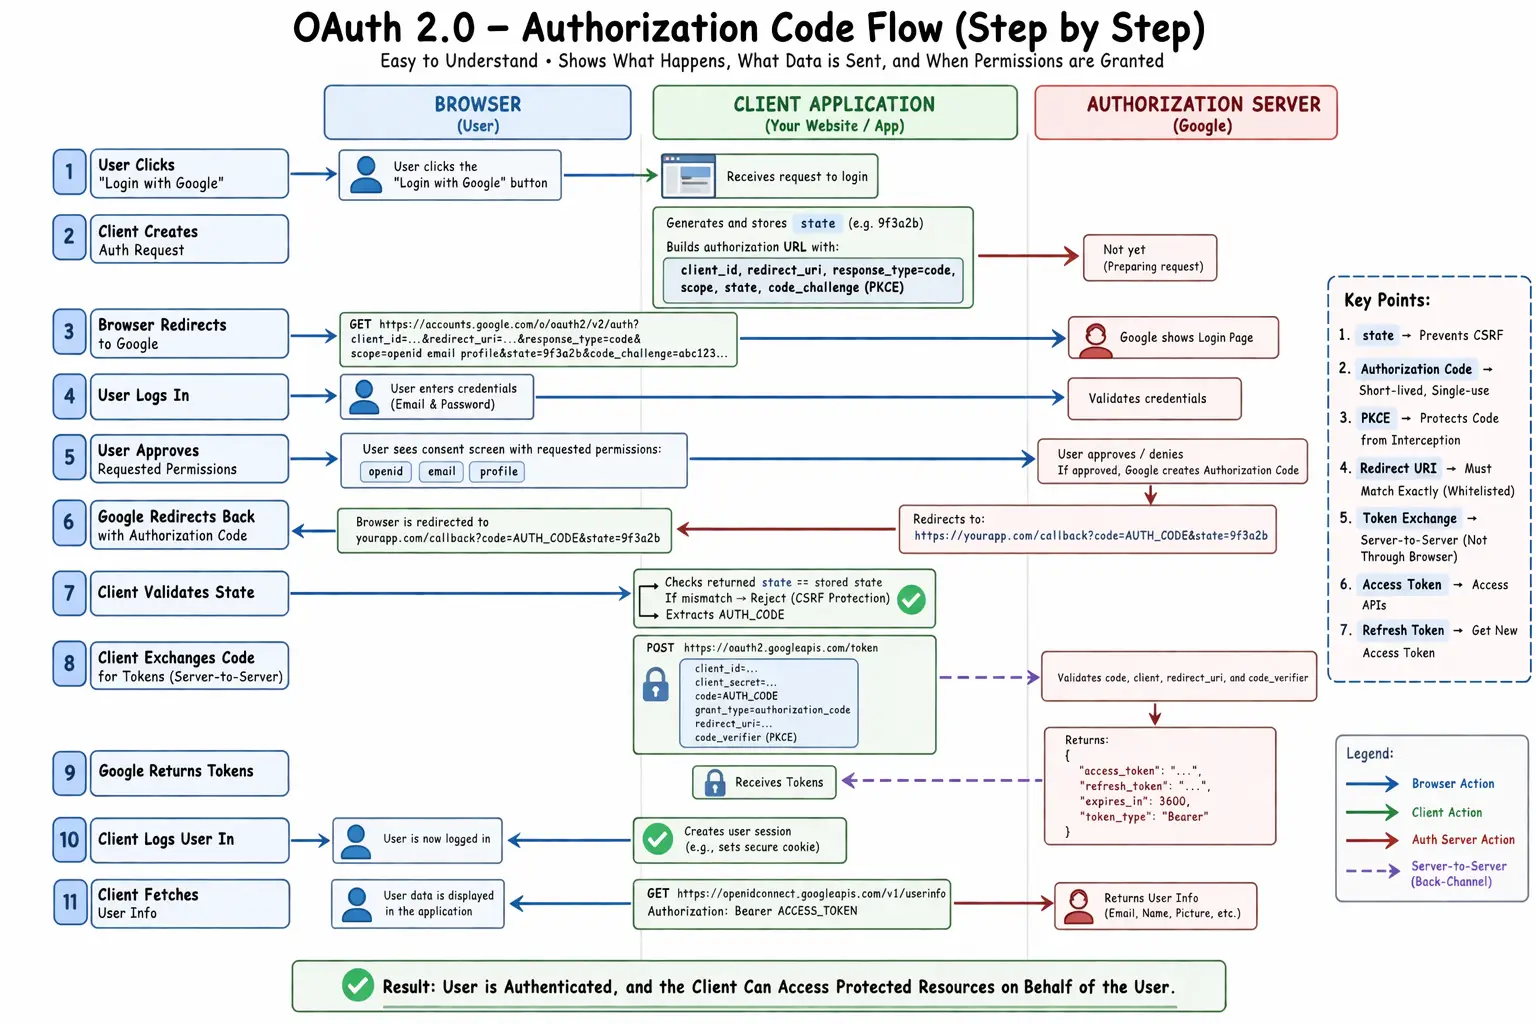
This is the most secure and widely used OAuth 2.0 flow. Here’s exactly how it works:
Step 1 — User Initiates Login
The user visits the client application and clicks “Login with Google” or any other provider.
Step 2 — Client Prepares the Authorization Request
The client builds a request with the following parameters:
client_id— identifies the applicationredirect_uri— where to send the user after loginresponse_type=code— tells the server to return an authorization codescope— the permissions being requested (e.g.,openid email profile)state— a randomly generated value for CSRF protectioncode_challenge— A PKCE parameter used to protect the authorization code from interception.
GET /authorize?
  client_id=...
  &redirect_uri=...
  &response_type=code
  &scope=...
  &state=...
  &code_challenge=...
Note on the
stateparameter: It’s not just random noise — it gets stored in the client application’s database (or via a secure session cookie) and is explicitly tied to the user’s current session. When the callback arrives, the app checks that the returnedstatematches what it stored. If it doesn’t match, the request gets rejected immediately.
Step 3 — Redirect to Authorization Server
The browser is redirected to the authorization server (e.g., Google’s login page).
Step 4 — User Authenticates
The user logs in directly on the authorization server. The client application never sees the credentials.
Step 5 — User Gives Consent
The authorization server displays the requested permissions. The user reviews and approves them.
Step 6 — Authorization Code Issued
The authorization server generates a short-lived authorization code and redirects the browser back to the client:
https://app.com/callback?code=AUTH_CODE&state=random_xyzStep 7 — Client Validates the Response
Before doing anything else, the client verifies that the returned state matches what it stored. If it matches, it extracts the authorization code. If it doesn’t — the request is rejected outright.
Step 8 — Token Exchange (Back-Channel)
The client’s backend sends the authorization code to the authorization server along with:
client_id— identifies the applicationclient_secret— proves the request is genuinely coming from the backend (never exposed to the browser).grant_type=authorization_code— tells the server which OAuth flow is being usedcode_verifier— The PKCE counterpart to thecode_challenge, proving this exact client instance initiated the flow.
POST /token
  client_id=...
  client_secret=...
  code=AUTH_CODE
  grant_type=authorization_code
  code_verifier=...
This entire exchange happens server-to-server. The browser is completely out of the picture.
Step 9 — Tokens Returned
The authorization server responds with:
{
  "access_token": "...",
  "id_token": "...",
  "refresh_token": "...",
  "expires_in": 3600,
  "token_type": "Bearer"
}
Step 10 — User is Logged In
The client validates the id_token to confirm the user’s identity, stores the tokens securely, and creates a local session for the user.
Step 11 — Fetch User Data
The client can optionally call the /userinfo endpoint on the authorization server to retrieve additional user profile details:
GET /userinfo
Authorization: Bearer ACCESS_TOKEN
The server returns the user’s email, name, and any other data within the approved scope.
Using OAuth for Login (SSO)
OAuth was originally designed purely for authorization, but it’s now the backbone of social login when paired with OpenID Connect (OIDC). Those “Log in with Google” or “Continue with Facebook” buttons you see everywhere are almost always utilizing OIDC layered on top of OAuth 2.0.
The flow itself remains largely the same, but OIDC introduces the openid scope and the id_token. Instead of relying solely on an access token to call an API and guess the user’s identity, the app receives a cryptographically signed id_token that explicitly proves who just logged in.
Common OAuth Vulnerabilities
| Vulnerability | Impact |
|---|---|
Missing state parameter | CSRF attack / Account takeover |
Weak redirect_uri validation | Token leakage / Open redirect |
| Authorization code reuse | Token theft |
| Token leakage in logs or URLs | Unauthorized access |
| Missing PKCE on mobile apps | Code interception attack |
| Improper scope handling | Excessive data exposure |
PKCE — The Fix for Mobile & Single-Page Apps
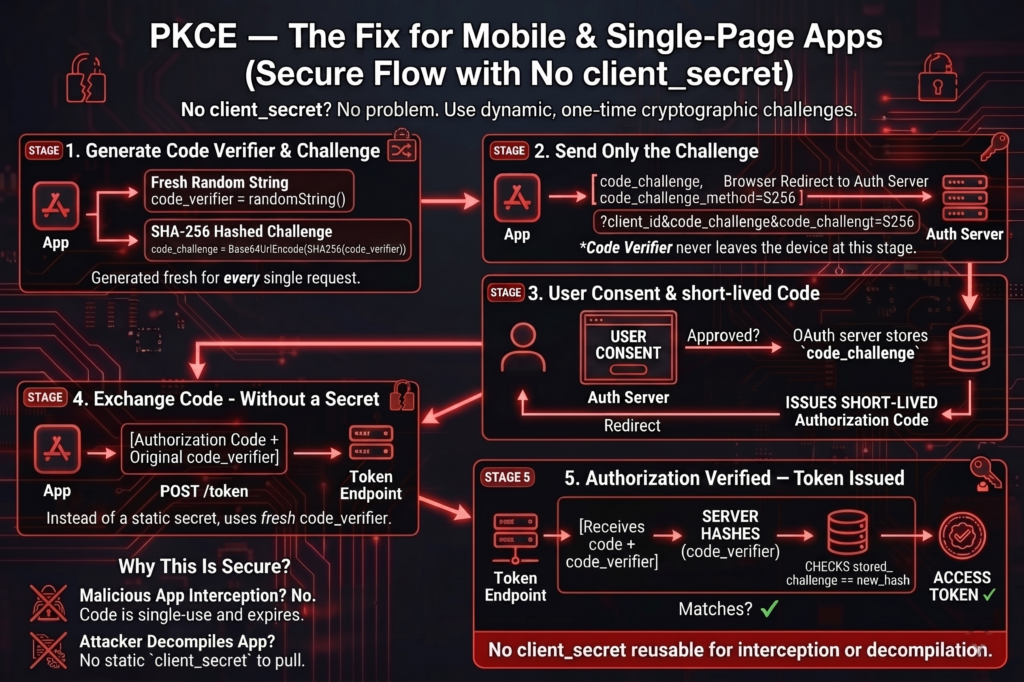
Everything in the Authorization Code Flow works perfectly when there’s a secure backend. But mobile apps and single-page apps have a problem — there’s no safe place to store a client_secret.
If the app sends the client_secret directly from the device, two major things can go wrong:
- A man-in-the-middle attack can intercept the request and steal it
- An attacker can simply decompile the app and pull the secret straight out of the code
PKCE (Proof Key for Code Exchange) is a lightweight extension to the authorization flow. It effectively replaces the need for a static client_secret with a dynamically generated, one-time cryptographic challenge.
Here’s how it works:
1. Generate a Code Verifier
Every time an authorization request is made, the app generates a fresh random string:
code_verifier = randomString()2. Hash it into a Code Challenge
The verifier is hashed using SHA-256 and Base64URL-encoded to produce the challenge. Both values are generated fresh for every single request—nothing is ever reused:
code_challenge = Base64UrlEncode(SHA256(code_verifier))3. Send Only the Challenge
The app sends the code_challenge to the authorization server during the initial login request. The actual verifier never leaves the device at this stage:
?client_id&code_challenge&code_challenge_method=S2564. User Gives Consent
After the user approves, the OAuth server issues a short-lived authorization code, stores the code_challenge in its database, and redirects the user back to the app with the code.
5. Exchange the Code — Without a Secret
To get the access token, the app sends the authorization code to the server, but instead of a client_secret, it sends the original, unhashed code_verifier.
6. Server Validates the Hash
The authorization server takes the newly received code_verifier, hashes it using the exact same algorithm, and checks whether the result matches the code_challenge it stored in Step 4. If they match, the access token is issued.But Can’t an Attacker Just Intercept This?
The most common attack vector on mobile devices is a malicious app registering the same custom URI scheme (e.g., myapp://callback) and intercepting the returning authorization code.
This is exactly what PKCE prevents. Even if an attacker successfully intercepts the authorization code mid-flight, the code is completely useless to them. To exchange that code for an access token, the authorization server requires the original code_verifier. Because the verifier never left the legitimate app, the attacker’s token request will be rejected.
Bottom line: PKCE is the standard, required solution for any environment where storing a client_secret securely isn’t possible. It keeps the entire flow secure by ensuring that the exact same application instance that initiated the request is the only one that can finish it.